
Mapping UIDs and GIDs with Nodemap
This chapter describes how to map UID and GIDs across a Lustre file system using the nodemap feature, and includes the following sections:
- Setting a Mapping
- Removing Nodemaps
- Altering Properties
- Enabling the Feature
- default Nodemap
- Verifying Settings
- Ensuring Consistency
Setting a Mapping
The nodemap feature allows UIDs and GIDs from remote systems to be mapped to local sets of UIDs and GIDs while retaining POSIX ownership, permissions and quota information. As a result, multiple sites with conflicting user and group identifiers can operate on a single Lustre file system without creating collisions in UID or GID space.
Defining Terms
When the nodemap feature is enabled, client file system access to a Lustre system is filtered through the nodemap identity mapping policy engine. Lustre connectivity is governed by network identifiers, or NIDs, such as 192.168.7.121@tcp. When an operation is made from a NID, Lustre decides if that NID is part of a nodemap, a policy group consisting of one or more NID ranges. If no policy group exists for that NID, access is squashed to user nobody by default. Each policy group also has several properties, such as trusted and admin, which determine access conditions. A collection of identity maps or idmaps are kept for each policy group. These idmaps determine how UIDs and GIDs on the client are translated into the canonical user space of the local Lustre file system.
In order for nodemap to function properly, the MGS, MDS, and OSS systems must all have a version of Lustre which supports nodemap. Clients operate transparently and do not require special configuration or knowledge of the nodemap setup.
Note
A nodemap name has a maximum length of 16 characters, and can contain only alphanumeric characters and ‘_’.
Deciding on NID Ranges
NIDs can be described as either a singleton address or a range of addresses. A single address is described in standard Lustre NID format, such as 10.10.6.120@tcp. A range is described using a dash to separate the range, for example, 192.168.20.[0-255]@tcp.
The range must be contiguous. The full LNet definition for a nidlist is as follows:
<nidlist>       :== <nidrange> [ ' ' <nidrange> ]
<nidrange>      :== <addrrange> '@' <net>
<addrrange>     :== '*' |
                        <ipaddr_range> |
                        <numaddr_range>
<ipaddr_range>  :==
        <numaddr_range>.<numaddr_range>.<numaddr_range>.<numaddr_range>
<numaddr_range> :== <number> |
                        <expr_list>
<expr_list>     :== '[' <range_expr> [ ',' <range_expr>] ']'
<range_expr>    :== <number> |
                        <number> '-' <number> |
                        <number> '-' <number> '/' <number>
<net>           :== <netname> | <netname><number>
<netname>       :== "lo" | "tcp" | "o2ib" | "gni"
<number>        :== <nonnegative decimal> | <hexadecimal>
Defining a Servers Specific Group
For proper operations, the Lustre file system requires to have a privileged group that covers all Lustre server nodes. So the very first step when working with nodemaps is to create such a group with both properties admin and trusted set. It is recommended to give this group an explicit label such as TrustedSystem or some identifier that makes the association clear.
Let’s consider a deployment where the server nodes are in the NID range 192.168.0.[1-10]@tcp. Create the policy group, add the NID range to that group, and set the properties accordingly using the lctl command on the MGS:
mgs# lctl nodemap_add TrustedSystems
mgs# lctl nodemap_add_range --name TrustedSystems --range 192.168.0.[1-10]@tcp
mgs# lctl nodemap_modify --name TrustedSystems --property admin --value 1
mgs# lctl nodemap_modify --name TrustedSystems --property trusted --value 1
Describing and Deploying a Sample Mapping
Deploy nodemap by first considering which users need to be mapped, and what sets of network addresses or ranges are involved. Issues of visibility between users must be examined as well.
Consider a deployment where researchers are working on data relating to birds. The researchers use a computing system which mounts the filesystem from a single IPv4 address, 192.168.0.100, and sensors which mount the filesystem from an address range 192.168.0.[50-99]. Name this policy group BirdResearchSite. Create the policy group and add the NID ranges to that group on the MGS using the lctl command:
        mgs# lctl nodemap_add BirdResearchSite
        mgs# lctl nodemap_add_range --name BirdResearchSite --range 192.168.0.100@tcp
        mgs# lctl nodemap_add_range --name BirdResearchSite --range 192.168.0.[50-99]@tcp
Later, additional sensors were added that use addresses in the range 192.168.10.[101-150] that increased the number of nodes in the BirdResearchSite nodemap, but otherwise are managed as part of the same nodemap.
mgs# lctl nodemap_add_range --name BirdResearchSite --range 192.168.0.[101-150]@tcpNote
A NID cannot be in more than one policy group. Assign a NID to a new policy group by first removing it from the existing group.
The researchers use the following identifiers on their host system:
swan(UID 530) member of groupwetlands(GID 600)duck(UID 531) member of groupwetlands(GID 600)hawk(UID 532) member of groupraptor(GID 601)merlin(UID 533) member of groupraptor(GID 601)
Assign a set of six idmaps to this policy group, with four for UIDs, and two for GIDs. Pick a starting point, e.g. UID 11000, with room for additional UIDs and GIDs to be added as the configuration grows. Use the lctl command to set up the idmaps:
mgs# lctl nodemap_add_idmap --name BirdResearchSite --idtype uid --idmap 530:11000
mgs# lctl nodemap_add_idmap --name BirdResearchSite --idtype uid --idmap 531:11001
mgs# lctl nodemap_add_idmap --name BirdResearchSite --idtype uid --idmap 532:11002
mgs# lctl nodemap_add_idmap --name BirdResearchSite --idtype uid --idmap 533:11003
mgs# lctl nodemap_add_idmap --name BirdResearchSite --idtype gid --idmap 600:11000
mgs# lctl nodemap_add_idmap --name BirdResearchSite --idtype gid --idmap 601:11001
The parameter 530:11000 assigns a client UID, for example UID 530, to a single canonical UID, such as UID 11000. Each assignment is made individually. There is no method to specify a range 530-533:11000-11003. UID and GID idmaps are assigned separately. There is no implied relationship between the two.
Files created on the Lustre file system from the 192.168.0.100@tcp NID using UID duck and GID wetlands are stored in the Lustre file system using the canonical identifiers, in this case UID 11001 and GID 11000. A different NID, if not part of the same policy group, sees its own view of the same file space.
Suppose a previously created project directory exists owned by UID 11002/GID 11001, with mode 770. When users hawk and merlin at 192.168.0.100 place files named hawk-file and merlin-file into the directory, the contents from the 192.168.0.100 client appear as:
[merlin@192.168.0.100 projectsite]$ ls -la
total 34520
drwxrwx--- 2 hawk   raptor     4096 Jul 23 09:06 .
drwxr-xr-x 3 nobody nobody     4096 Jul 23 09:02 ..
-rw-r--r-- 1 hawk   raptor 10240000 Jul 23 09:05 hawk-file
-rw-r--r-- 1 merlin raptor 25100288 Jul 23 09:06 merlin-file
From a privileged view, the canonical owners are displayed:
[root@trustedSite projectsite]# ls -la
total 34520
drwxrwx--- 2 11002 11001     4096 Jul 23 09:06 .
drwxr-xr-x 3 root root     4096 Jul 23 09:02 ..
-rw-r--r-- 1 11002 11001 10240000 Jul 23 09:05 hawk-file
-rw-r--r-- 1 11003 11001 25100288 Jul 23 09:06 merlin-file
If UID 11002 or GID 11001 do not exist on the Lustre MDS or MGS, create them in LDAP or other data sources, or trust clients by setting identity_upcall to NONE. For more information, see User/Group Upcall.
Building a larger and more complex configuration is possible by iterating through the lctl commands above. In short:
- Create a name for the policy group.
- Create a set of NID ranges used by the group.
- Define which UID and GID translations need to occur for the group.
Mapping Project IDs
Like UIDs and GIDs, PROJIDs can be mapped via nodemaps, from client to file system IDs and conversely. To declare a PROJID mapping, use the projid type:
mgs# lctl nodemap_add_idmap --name BirdResearchSite --idtype projid --idmap 33:1Defining Mapping Offsets
Mapping offsets map all client ids to a new range specified by an offset, such that fs_id = client_id + offset. The nodemap_add_offset command defines a mapping offset for a given nodemap and applies the offset to all UID, GID, and PROJID types.
lctl nodemap add_offset --name NAME --offset OFFSET --limit FSID_COUNTThis command allows admins to create offset ranges for client systems to avoid overlapping assignments in multi-tenant systems. The FSID_COUNT specifies the number of IDs mapped by the range, starting with the root(0) user/group/project ID and extending through FSID_COUNT-1.
An offset range cannot overlap with another offset range. A nodemap can only have one offset defined. To modify the offset already defined, just assign a new value. Any existing files will not automatically be remapped to the new OFFSET range. IDs must be manually changed on all files for that nodemap with chown(1) and lfs-project(1) on a trusted client that has access to the unmapped, canonical file system IDs. Therefore modifying a nodemap offset should be avoided if possible.
For example, to map the client UID, GID, and PROJID values from the range 0-199999 to the filesystem UID, GID, and PROJID values to the range 100000-299999:
mgs# lctl nodemap_add_offset --name remotesite --offset 100000 --limit 200000Once an offset is set on a nodemap, please make sure the explicit mappings are defined so that they do not escape the offset range. This means an explicit mapping should not map a client id to a file system id greater than FSID_COUNT-1. Similarly, the squash_uid, squash_gid and squash_projid values should not be set to a value greater than FSID_COUNT-1. Otherwise this would produce file system ids outside of the offset range.
If not zero, the mapping offset is always applied as the last stage of the mapping process. Flow chart: nodemap identity mapping gives a simplified view of the identity mapping process that happens when nodemap is activated, to convert a client id to a file system canonical id.
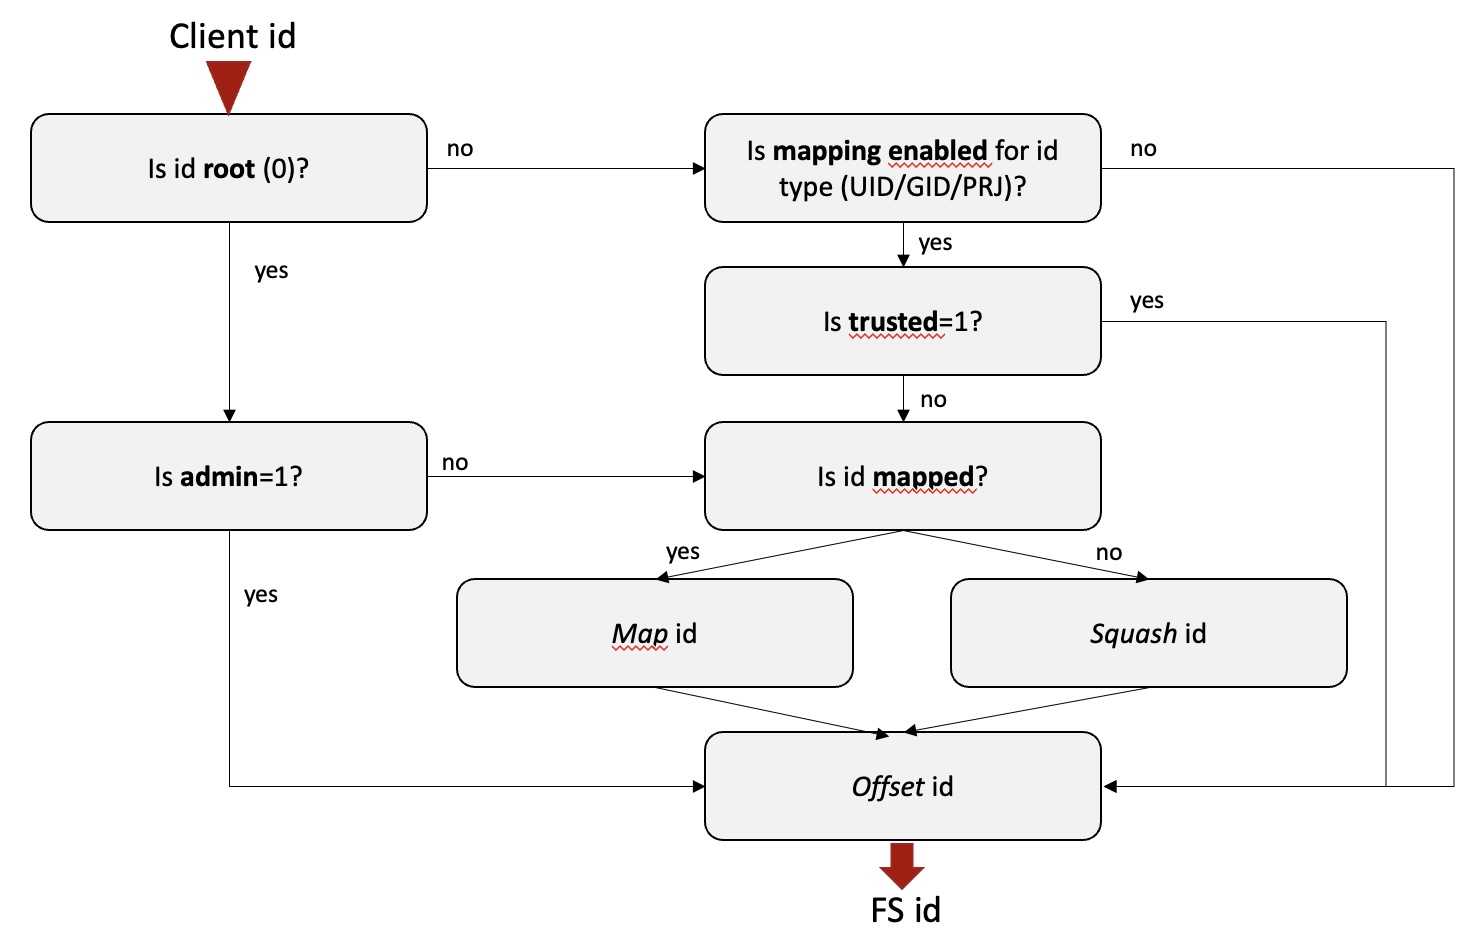
To deactivate id mapping offset, use the nodemap_del_offset command.
lctl nodemap del_offset --name NAMENote
As when changing the ID offset value, deleting the ID offset will not remap files created with the offset IDs. It is up to the storage administrator to delete or reset UID/GID/PROJID for files that were created with the mapped IDs. Generally, an ID offset should remain unchanged for the entire nodemap lifetime and not be deleted without a clear understanding of the operational impact.
Removing Nodemaps
It is possible to delete a NID range from a nodemap, any clients in this NID range will be moved to the default nodemap.
mgs# lctl nodemap_del_range --name BirdResearchSite --range 192.168.0.[101-150]@tcpWhen deleting a range from a nodemap it must be the same range that was declared when using nodemap_add_range. This means that it is not possible to remove a range inside of the initial values or a (partially) overlapping range. Also worth noting, if two different ranges are added that are adjacent, they are still treated as two independent ranges and must be each individually deleted.
When deleting a whole policy group all of the associated ID mappings, NID ranges, and other parameters will be removed, and existing clients will be moved to the default nodemap. The default nodemap cannot be deleted. The syntax is:
mgs# lctl nodemap_del BirdResearchSiteAltering Properties
Privileged users access mapped systems with rights dependent on certain properties, described below. By default, root access is squashed to user nobody, which interferes with most administrative actions.
For proper operations, the Lustre file system requires a group that covers all Lustre server nodes, with both properties admin and trusted set. It is recommended to give this group an explicit label such as TrustedSystems or some identifier that makes the association clear.
Managing the Properties
Several properties exist, off by default, which change client behavior: admin, trusted, map_mode, squash_uid, squash_gid, squash_projid, deny_unknown, audit_mode and forbid_encryption.
-
The property
admindefines whether root is squashed on the policy group. By default, it is squashed, unless this property is enabled. Coupled with thetrustedproperty, this will allow unmapped access for backup nodes, transfer points, or other administrative mount points. -
The
trustedproperty permits members of a policy group to see the file system’s canonical identifiers. In the above example, UID 11002 and GID 11001 will be seen without translation. This can be utilized when local UID and GID sets already map directly to the specified users. -
The
map_modeproperty lets control the way mapping is carried out. By default it is set toallwhich means the nodemap will map UIDs, GIDs, and PROJIDs. If set touid_onlyor justuid, only UIDs will be mapped. If set togid_onlyor justgid, only GIDs will be mapped. If set toprojid_onlyor justprojid, only PROJIDs will be mapped. If set toboth, both UIDs and GIDs will be mapped. Multiple values can be specified, comma separated. -
The properties
squash_uid,squash_gidandsquash_projiddefine the default UID, GID and PROJID respectively that users will be squashed to if unmapped, unless the deny_unknown flag is set, in which case access will still be denied.Note
The
squash_projidproperty was introduced in Lustre 2.15 -
The property
deny_unknowndenies all access to users not mapped in a particular nodemap. This is useful if a site is concerned about unmapped users accessing the file system in order to satisfy security requirements. -
The property
audit_modelets control which Lustre client nodes can trigger the recording of file system access events to the Changelogs. When this flag is set to 1, clients will be able to record file system access events to the Changelogs, if Changelogs are otherwise activated. When set to 0, events are not logged into the Changelogs, no matter if Changelogs are activated or not. By default, this flag is set to 1 in newly created nodemap entries. And it is also set to 1 in ‘default’ nodemap. -
The property
forbid_encryptionprevents clients from using encryption. -
The property
readonly_mountforces clients to a read-only mount if not specified explicitly. By default it is set to 0 which means clients are allowed to mount in read-write mode. Set it to 1 to force read-only mount. -
The property
rbacdefines different Role-Based Admin Control mechanisms:byfid_ops, to allow operations by FID (e.g. ‘lfs rmfid’).chlg_ops, to allow access to Lustre Changelogs.dne_ops, to allow operations related to DNE (e.g. ‘lfs mkdir’).file_perms, to allow modifications of file permissions and owners.fscrypt_admin, to allow fscrypt related admin tasks (create or modify protectors/policies). Note that even without this role, it is still possible to lock or unlock encrypted directories, as these operations only need read access to fscrypt metadata.quota_ops, to allow quota modifications.
The default value for this property is
all, which means all roles are allowed. Multiple values among those listed above can be specified, comma separated. Apart from all, any role not explicitly specified is forbidden. And to forbid all roles, usenonevalue. -
The property
deny_mountcontrols whether nodes assigned to the nodemap are allowed to mount new Lustre clients. By default this is allowed and the property is set to 0. Set it to 1 to prevent nodes from establishing new client mounts. Note that existing client mounts are not evicted and will continue to work until a remount is attempted.
Alter values to either true (1) or false (0) on the MGS:
mgs# lctl nodemap_modify --name BirdAdminSite --property trusted --value 1
mgs# lctl nodemap_modify --name BirdAdminSite --property admin --value 1
mgs# lctl nodemap_modify --name BirdAdminSite --property deny_unknown --value 1
Change values during system downtime to minimize the chance of any ownership or permissions problems if the policy group is active. Although changes can be made live, client caching of data may interfere with modification as there are a few seconds of lead time before the change is distributed.
Mixing Properties
With both admin and trusted properties set, the policy group has full access, as if nodemap was turned off, to the Lustre file system. The administrative site for the Lustre file system needs at least one group with both properties in order to perform maintenance or to perform administrative tasks.
Warning
Lustre server nodes must be in a policy group with both these properties set to 1. It is recommended to use a policy group labeled TrustedSystems or some identifier that makes the association clear.
If a policy group has the admin property set, but does not have the property trusted set, root is mapped directly to root, any explicitly specified UID and GID idmaps are honored, and other access is squashed. If root alters ownership to UIDs or GIDs which are locally known from that host but not part of an idmap, root effectively changes ownership of those files to the default squashed UID and GID.
If trusted is set but admin is not, the policy group has full access to the canonical UID and GID sets of the Lustre file system, and root is squashed.
The deny_unknown property, once enabled, prevents unmapped users from accessing the file system. Root access also is denied, if the admin property is off, and root is not part of any mapping.
To prevent a client from changing quota settings for a project other than the one assigned to the fileset it is restricted to, you should map the PROJID to itself, set map_mode to projid, and then trusted to 0 and deny_unknown to 1. This way, only operations on the designated PROJID will be allowed.
When nodemaps are modified, the change events are queued and distributed across the cluster. Under normal conditions, these changes can take around ten seconds to propagate. During this distribution window, file access could be made via the old or new nodemap settings. Therefore, it is recommended to save changes for a maintenance window or to deploy them while the mapped nodes are not actively writing to the file system.
Enabling the Feature
The nodemap feature is simple to enable:
mgs# lctl nodemap_activate 1Passing the parameter 0 instead of 1 disables the feature again. After deploying the feature, validate the mappings are intact before offering the file system to be mounted by clients.
So far, changes have been made on the MGS. Prior to Lustre 2.9, changes must also be manually set on MDS systems as well. Also, changes must be manually deployed to OSS servers if quota is enforced, utilizing lctl set_param instead of lctl. Prior to 2.9, the configuration is not persistent, requiring a script which generates the mapping to be saved and deployed after every Lustre restart. As an example, use this style to deploy settings on the OSS:
oss# lctl set_param nodemap.add_nodemap=SiteName
oss# lctl set_param nodemap.add_nodemap_range='SiteName 192.168.0.15@tcp'
oss# lctl set_param nodemap.add_nodemap_idmap='SiteName uid 510:1700'
oss# lctl set_param nodemap.add_nodemap_idmap='SiteName gid 612:1702'
In Lustre 2.9 and later, nodemap configuration is saved on the MGS and distributed automatically to MGS, MDS, and OSS nodes, a process which takes approximately ten seconds in normal circumstances.
default Nodemap
There is a special nodemap called default. As the name suggests, it is created by default and cannot be removed. It is like a fallback nodemap, setting the behaviour for Lustre clients that do not match any other nodemap.
Because of its special role, only some parameters can be set on the default nodemap:
admintrustedsquash_uidsquash_gidfilesetaudit_mode
In particular, no UID/GID mapping can be defined on the default nodemap.
Note
Be careful when altering the admin and trusted properties of the default nodemap, especially if your Lustre servers fall into this nodemap.
Verifying Settings
By using lctl nodemap_info all, existing nodemap configuration is listed for easy export. This command acts as a shortcut into the configuration interface for nodemap. On the Lustre MGS, the nodemap.active parameter contains a 1 if nodemap is active on the system. Each policy group creates a directory containing the following parameters:
adminandtrustedeach contain a1if the values are set, and0otherwise.idmapcontains a list of the idmaps for the policy group, whilerangescontains a list of NIDs for the group.squash_uidandsquash_giddetermine what UID and GID users are squashed to if needed.
The expected outputs for the BirdResearchSite in the example above are:
mgs# lctl get_param nodemap.BirdResearchSite.idmap

 [
  { idtype: uid, client_id: 530, fs_id: 11000 },
  { idtype: uid, client_id: 531, fs_id: 11001 },
  { idtype: uid, client_id: 532, fs_id: 11002 },
  { idtype: uid, client_id: 533, fs_id: 11003 },
  { idtype: gid, client_id: 600, fs_id: 11000 },
  { idtype: gid, client_id: 601, fs_id: 11001 }
 ]

 mgs# lctl get_param nodemap.BirdResearchSite.ranges
 [
  { id: 11, start_nid: 192.168.0.100@tcp, end_nid: 192.168.0.100@tcp }
 ]
Ensuring Consistency
Consistency issues may arise in a nodemap enabled configuration when Lustre clients mount from an unknown NID range, new UIDs and GIDs that were not part of a known map are added, or there are misconfigurations in the rules. Keep in mind the following when activating nodemap on a production system:
- Creating new policy groups or idmaps on a production system is allowed, but reserve a maintenance window to alter the
trustedproperty to avoid metadata problems. - To perform administrative tasks, access the Lustre file system via a policy group with
trustedandadminproperties set. This prevents the creation of orphaned and squashed files. Granting theadminproperty without thetrustedproperty is dangerous. The root user on the client may know of UIDs and GIDs that are not present in any idmap. If root alters ownership to those identifiers, the ownership is squashed as a result. For example, tar file extracts may be flipped from an expected UID such as UID 500 tonobody, normally UID 99. - To map distinct UIDs at two or more sites onto a single UID or GID on the Lustre file system, create overlapping idmaps and place each site in its own policy group. Each distinct UID may have its own mapping onto the target UID or GID.
- In Lustre 2.8, changes must be manually kept in a script file to be re-applied after a Lustre reload, and changes must be made on each OSS, MDS, and MGS nodes, as there is no automatic synchronization between the nodes.
- If
deny_unknownis in effect, it is possible for unmapped users to see dentries which were viewed by a mapped user. This is a result of client caching, and unmapped users will not be able to view any file contents. - Nodemap activation status can be checked with
lctl nodemap_info, but extra validation is possible. One way of ensuring valid deployment on a production system is to create a fingerprint of known files with specific UIDs and GIDs mapped to a test client. After bringing the Lustre system online after maintenance, the test client can validate the UIDs and GIDs map correctly before the system is mounted in user space.